这部分我们来具体的看一下 Spring AOP 实现中,代理类究竟是什么时候被构建的。
案例准备
maven pom 文件
- spring.version:5.3.22
- java.version:1.8
 1
 2
 3
 4
 5
 6
 7
 8
 9
10
11
12
13
14
15
16
17
18
19
20
| <!-- Spring核心库 -->
<dependency>
<groupId>org.springframework</groupId>
<artifactId>spring-core</artifactId>
<version>${spring.version}</version>
</dependency>
<!-- Spring IoC容器 -->
<dependency>
<groupId>org.springframework</groupId>
<artifactId>spring-beans</artifactId>
<version>${spring.version}</version>
</dependency>
<!-- Spring上下文支持,提供了BeanFactory的扩展 -->
<dependency>
<groupId>org.springframework</groupId>
<artifactId>spring-context</artifactId>
<version>${spring.version}</version>
</dependency>
|
Service 接口与实现类
 1
 2
 3
 4
 5
 6
 7
 8
 9
10
11
12
13
14
15
16
17
18
19
20
21
| public interface IUserService {
void queryUserName(String uId);
void queryUserId(String name);
}
public class UserService implements IUserService {
@Override
public void queryUserName(String uId) {
System.out.println("查询用户名称为:ryan");
}
@Override
public void queryUserId(String name) {
System.out.println("查询用户ID为:10001");
}
}
|
通知类
 1
 2
 3
 4
 5
 6
 7
 8
 9
10
11
| public class LogAdvices {
public void before() {
System.out.println("before");
}
public void after() {
System.out.println("after");
}
}
|
- 为了演示方便,本文所有的 Bean 都会通过配置文件来配置。
Main 方法
 1
 2
 3
 4
 5
 6
 7
 8
 9
10
| public class Main {
public static void main(String[] args) {
ClassPathXmlApplicationContext applicationContext = new ClassPathXmlApplicationContext("spring-aop.xml");
IUserService service = applicationContext.getBean("userService", IUserService.class);
System.out.println(service.getClass());
service.queryUserName("10001");
}
}
|
spring xml 配置文件
 1
 2
 3
 4
 5
 6
 7
 8
 9
10
11
12
13
14
15
16
17
| <?xml version="1.0" encoding="UTF-8"?>
<beans xmlns="http://www.springframework.org/schema/beans"
xmlns:xsi="http://www.w3.org/2001/XMLSchema-instance" xmlns:aop="http://www.springframework.org/schema/aop"
xsi:schemaLocation="http://www.springframework.org/schema/beans http://www.springframework.org/schema/beans/spring-beans.xsd http://www.springframework.org/schema/aop https://www.springframework.org/schema/aop/spring-aop.xsd">
<bean id="userService" class="com.ryan.aop_test.service.impl.UserService"/>
<bean id="logAspect" class="com.ryan.aop_test.LogAdvices" />
<aop:config>
<aop:pointcut id="point1" expression="execution(* com.ryan.aop_test.service.*.*(..))" />
<aop:aspect ref="logAspect">
<aop:before method="before" pointcut-ref="point1"/>
<aop:after-returning method="after" pointcut-ref="point1" />
</aop:aspect>
</aop:config>
</beans>
|
关于 spring 通过 xml 配置 aop 的具体内容可以参照官网:
文档地址:https://docs.spring.io/spring-framework/docs/5.2.25.RELEASE/spring-framework-reference/core.html#aop-schema
需要注意,这种方式使用的是 Spring 的自动代理机制,如果有类似 BeanNameAutoProxyCreator 或类似的类使用了显示的代理,会导致其中的某一项失效。
建议的使用方式是仅使用<aop:config>样式或仅使用AutoProxyCreator样式,并且切勿混合使用它们。
执行结果
先来看一下上面的 Main 方法执行后的效果:
1
2
3
4
| class com.sun.proxy.$Proxy3
before
查询用户名称为:ryan
after
|
可以看到,我们获取到的类是一个代理类,并且代理方法已经执行成功了。
源码分析
XML 解析
当执行下面这条语句之后:
1
| ClassPathXmlApplicationContext applicationContext = new ClassPathXmlApplicationContext("spring-aop.xml");
|
会执行 ClassPathXmlApplicationContext 的 refresh 方法:
org.springframework.context.support.AbstractApplicationContext#refresh()
 1
 2
 3
 4
 5
 6
 7
 8
 9
10
11
12
13
| @Override
public void refresh() throws BeansException, IllegalStateException {
synchronized (this.startupShutdownMonitor) {
StartupStep contextRefresh = this.applicationStartup.start("spring.context.refresh");
// Prepare this context for refreshing.
prepareRefresh();
// Tell the subclass to refresh the internal bean factory.
ConfigurableListableBeanFactory beanFactory = obtainFreshBeanFactory();
// ......
}
|
其中 obtainFreshBeanFactory 会执行 Bean 工厂的初始化,其中最重要的部分就是将 XML 配置文件中的 Bean 定义(Bean Definition)加载到 Bean 工厂中。
1
2
3
4
5
6
| org.springframework.context.support.AbstractApplicationContext#refresh()
=> org.springframework.context.support.AbstractRefreshableApplicationContext#refreshBeanFactory()
=> org.springframework.context.support.AbstractXmlApplicationContext#loadBeanDefinitions(DefaultListableBeanFactory beanFactory)
上面的是从 `refresh()` 方法到具体加载 Bean Definition 方法的调用链路。
org.springframework.context.support.AbstractXmlApplicationContext#loadBeanDefinitions(DefaultListableBeanFactory beanFactory)
|
 1
 2
 3
 4
 5
 6
 7
 8
 9
10
11
12
13
14
| @Override
protected void loadBeanDefinitions(DefaultListableBeanFactory beanFactory) throws BeansException, IOException {
// Create a new XmlBeanDefinitionReader for the given BeanFactory.
XmlBeanDefinitionReader beanDefinitionReader = new XmlBeanDefinitionReader(beanFactory);
// Configure the bean definition reader with this context's
// resource loading environment. beanDefinitionReader.setEnvironment(this.getEnvironment());
beanDefinitionReader.setResourceLoader(this);
beanDefinitionReader.setEntityResolver(new ResourceEntityResolver(this));
// Allow a subclass to provide custom initialization of the reader,
// then proceed with actually loading the bean definitions. initBeanDefinitionReader(beanDefinitionReader);
loadBeanDefinitions(beanDefinitionReader);
}
|
- 具体解析 XML 和加载 Bean Definition 的方法
关于具体是如何解析 XML 的,这里就不细看了,我们直接看一下从我们的 XML 配置文件中可以解析到什么
配置文件:[[🗺️【spring-aop】Spring 代理类创建流程梳理#spring xml 配置文件]]
1
2
3
4
5
6
7
| beanDefinitionNames = {ArrayList@1626} size = 6
0 = "userService"
1 = "logAspect"
2 = "org.springframework.aop.config.internalAutoProxyCreator"
3 = "point1"
4 = "org.springframework.aop.aspectj.AspectJPointcutAdvisor#0"
5 = "org.springframework.aop.aspectj.AspectJPointcutAdvisor#1"
|
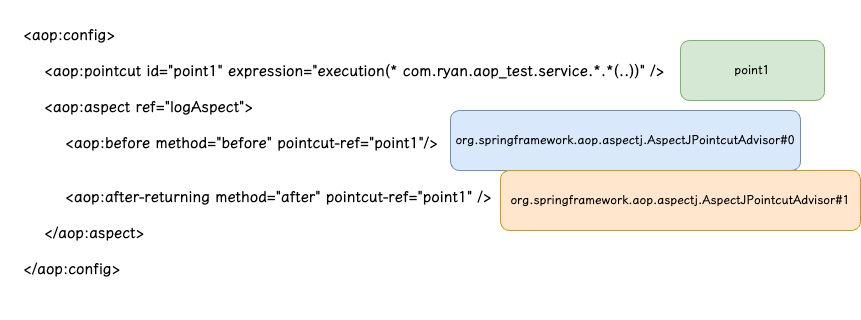
除了这些 infrastructure,上面还有一个 名称 为org.springframework.aop.config.internalAutoProxyCreator 的 Bean。
这个 Bean 的实际类型是:org.springframework.aop.framework.autoproxy.AbstractAdvisorAutoProxyCreator,它是一个 InstantiationAwareBeanPostProcessor,AbstractAdvisorAutoProxyCreator 类实现了下面这个方法:
1
2
3
| default Object postProcessBeforeInstantiation(Class<?> beanClass, String beanName) throws BeansException {
return null;
}
|
这个方法会在 Bean 的实例化前被调用,可以用于修改和创建 Bean 对象。
除此之外,AbstractAdvisorAutoProxyCreator 还实现了 BeanPostProcessor 接口的 postProcessAfterInitialization,在 Bean 对象执行完初始化方法后,会调用这个方法检测是否需要将其转化为代理对象。
AbstractAdvisorAutoProxyCreator 是 AOP 代理中非常关键的一个类,整个创建 AOP 代理的核心流程就是其执行的这两个方法。
加载 Creator
上面提到,org.springframework.aop.config.internalAutoProxyCreator 是一个 BeanPostProcessor,那它具体创建并注册的位置就是:
org.springframework.context.support#registerBeanPostProcessors(ConfigurableListableBeanFactory beanFactory)
调用这个方法的位置还是 ApplicationContext 的 refresh() 方法,具体的调用链路为:
1
2
3
| org.springframework.context.support.AbstractApplicationContext#refresh()
=> org.springframework.context.support.AbstractApplicationContext#registerBeanPostProcessors(ConfigurableListableBeanFactory beanFactory)
=> org.springframework.context.support.PostProcessorRegistrationDelegate#registerBeanPostProcessors(ConfigurableListableBeanFactory beanFactory, AbstractApplicationContext applicationContext)
|
具体就是将 BeanPostProcessor 加载到工厂中,方便后续的调用。
具体存放 BeanPostProcessor 的位置为:org.springframework.beans.factory.support.AbstractBeanFactory 的 beanPostProcessors 属性。
加载 Advisors
- 在「XML 解析」部分,我们看到了 spring 为我们将 xml 中定义的
<acp:config /> 解析为具体的 Bean 定义。 - 并且在「加载 Creator」部分,spring 已经将 AOP 创建者类注册成了一个
InstantiationAwareBeanPostProcessor。
在将单例 Bean(原型 Bean 也可以被代理,本文只关注单例 Bean 的代理过程)加载代理之前,肯定是要将上面 <acp:config /> 中配置的 Bean 构建出来的。
而如果按照我们在 xml 中配置的方式,显然先构建的 Bean 将会是 userService。
所以在所有的 Bean 实例化之前,需要确保这些构建 AOP 的 infrastructure 被提前构建好,这就是 AbstractAdvisorAutoProxyCreator 在 Bean 初始化之前执行的逻辑。
我们依然从 refresh() 方法开始:
 1
 2
 3
 4
 5
 6
 7
 8
 9
10
11
12
| org.springframework.context.support.AbstractApplicationContext#refresh()
=> org.springframework.context.support.AbstractApplicationContext#finishBeanFactoryInitialization(ConfigurableListableBeanFactory beanFactory)
=> org.springframework.beans.factory.support.DefaultListableBeanFactory#preInstantiateSingletons()
在预先实例化单例 Bean 的方法中,会对所有的 Bean 执行 `getBean()` 方法,`getBean()` 方法如果发现 Bean 没有被加载或者为原型 Bean,将会触发 Bean 的加载。
=> org.springframework.beans.factory.support.AbstractBeanFactory.getBean(String name)
=> org.springframework.beans.factory.support.AbstractBeanFactory.doGetBean(String name, @Nullable Class<T> requiredType, @Nullable Object[] args, boolean typeCheckOnly)
=> org.springframework.beans.factory.support.AbstractAutowireCapableBeanFactory#createBean(String beanName, RootBeanDefinition mbd, @Nullable Object[] args)
Bean 的 `createBean()` 方法实际上是延迟调用的,后续在 spring 三级缓存中会具体讲解,这里我们可以视为直接调用了 `createBean() 方法
=> org.springframework.beans.factory.support.AbstractAutowireCapableBeanFactory#resolveBeforeInstantiation(String beanName, RootBeanDefinition mbd)
=> org.springframework.beans.factory.support.AbstractAutowireCapableBeanFactory#applyBeanPostProcessorsBeforeInstantiation(Class<?> beanClass, String beanName)
|
这里就是具体执行 BeanPostProcessor 的位置:
1
2
3
4
5
6
7
8
9
| protected Object applyBeanPostProcessorsBeforeInstantiation(Class<?> beanClass, String beanName) {
for (InstantiationAwareBeanPostProcessor bp : getBeanPostProcessorCache().instantiationAware) {
Object result = bp.postProcessBeforeInstantiation(beanClass, beanName);
if (result != null) {
return result;
}
}
return null;
}
|
在这里会遍历所有的 BeanPostProcessor,然后调用其 postProcessBeforeInstantiation,上面的 AbstractAdvisorAutoProxyCreator 的该方法就是在这里调用的。
org.springframework.aop.framework.autoproxy.AbstractAutoProxyCreator#postProcessBeforeInstantiation(Class<?> beanClass, String beanName)
 1
 2
 3
 4
 5
 6
 7
 8
 9
10
11
12
13
14
15
16
17
18
19
20
21
22
23
24
25
26
27
28
| @Override
public Object postProcessBeforeInstantiation(Class<?> beanClass, String beanName) {
Object cacheKey = getCacheKey(beanClass, beanName);
if (!StringUtils.hasLength(beanName) || !this.targetSourcedBeans.contains(beanName)) {
if (this.advisedBeans.containsKey(cacheKey)) {
return null;
}
if (isInfrastructureClass(beanClass) || shouldSkip(beanClass, beanName)) {
this.advisedBeans.put(cacheKey, Boolean.FALSE);
return null;
}
}
// 如果有自定义的 TargetSource,则在这里创建代理对象
TargetSource targetSource = getCustomTargetSource(beanClass, beanName);
if (targetSource != null) {
if (StringUtils.hasLength(beanName)) {
this.targetSourcedBeans.add(beanName);
}
Object[] specificInterceptors = getAdvicesAndAdvisorsForBean(beanClass, beanName, targetSource);
Object proxy = createProxy(beanClass, beanName, specificInterceptors, targetSource);
this.proxyTypes.put(cacheKey, proxy.getClass());
return proxy;
}
return null;
}
|
在上面的 shouldSkip() 方法中,会尝试去获取所有的 Advisor,未创建的话,则会去尝试创建这些 Advisor。
1
2
3
| org.springframework.aop.framework.autoproxy.AbstractAutoProxyCreator#shouldSkip(Class<?> beanClass, String beanName)
=> org.springframework.aop.framework.autoproxy.AspectJAwareAdvisorAutoProxyCreator#findCandidateAdvisors()
=> org.springframework.aop.framework.autoproxy.BeanFactoryAdvisorRetrievalHelper#findAdvisorBeans()
|
 1
 2
 3
 4
 5
 6
 7
 8
 9
10
11
12
13
14
15
16
17
18
19
20
21
22
23
24
25
26
27
28
29
30
31
32
33
34
| public List<Advisor> findAdvisorBeans() {
// 获取 advisorNames
String[] advisorNames = this.cachedAdvisorBeanNames;
if (advisorNames == null) {
// Do not initialize FactoryBeans here: We need to leave all regular beans
// uninitialized to let the auto-proxy creator apply to them!
advisorNames = BeanFactoryUtils.beanNamesForTypeIncludingAncestors(
this.beanFactory, Advisor.class, true, false);
this.cachedAdvisorBeanNames = advisorNames;
}
if (advisorNames.length == 0) {
return new ArrayList<>();
}
// 不断从 Factory 中去 getBean()
List<Advisor> advisors = new ArrayList<>();
for (String name : advisorNames) {
if (isEligibleBean(name)) {
if (this.beanFactory.isCurrentlyInCreation(name)) {
if (logger.isTraceEnabled()) {
logger.trace("Skipping currently created advisor '" + name + "'");
}
}
else {
try {
advisors.add(this.beanFactory.getBean(name, Advisor.class));
}
catch (BeanCreationException ex) {
// ......
}
}
}
}
return advisors;
}
|
最终在 BeanFactoryAdvisorRetrievalHelper 中,获取到了所有的 advisor。
对于没有指定 targetSource 的 Bean,AbstractAdvisorAutoProxyCreator 不会对其进行任何操作,而是只进行了 Advisor 的初始化。
创建代理类
从 createBean() 方法开始,我们再来看一下代理类具体是怎么创建的:
1
2
3
4
5
6
| org.springframework.beans.factory.support.AbstractAutowireCapableBeanFactory#createBean(String beanName, RootBeanDefinition mbd, @Nullable Object[] args)
=> org.springframework.beans.factory.support.AbstractAutowireCapableBeanFactory#doCreateBean(String beanName, RootBeanDefinition mbd, @Nullable Object[] args)
doCreateBean 就是实际上创建 Bean 的方法,当 Bean 被实例化完成之后,会执行 Bean 的初始化,当其初始化结束之后,就会执行 AbstractAdvisorAutoProxyCreator 实现的另一个重要方法,代理类的构建就是在这里完成的。
=> `org.springframework.beans.factory.support.AbstractAutowireCapableBeanFactory#initializeBean(String beanName, Object bean, @Nullable RootBeanDefinition mbd)
=> `org.springframework.beans.factory.support.AbstractAutowireCapableBeanFactory#applyBeanPostProcessorsAfterInitialization(wrappedBean, beanName)
|
这个方法会执行所有的 BeanPostProcessor 的 postProcessAfterInitialization() 方法,AbstractAdvisorAutoProxyCreator 中的这个方法就是在这里执行的:
 1
 2
 3
 4
 5
 6
 7
 8
 9
10
| @Override
public Object postProcessAfterInitialization(@Nullable Object bean, String beanName) {
if (bean != null) {
Object cacheKey = getCacheKey(bean.getClass(), beanName);
if (this.earlyProxyReferences.remove(cacheKey) != bean) {
return wrapIfNecessary(bean, beanName, cacheKey);
}
}
return bean;
}
|